
Introducing get-it-ready
Quickly create your documentation ready REST APIs on HapiJS and Mongoose with get-it-ready.


Creating REST APIs has its own set of tedious tasks like create the endpoint for CRUD for any model which supports every field. To ease this process in Hapijs, we are glad to announce get-it-ready. This will covert simple Mongoose models to quick API related functions for you which you can quickly bind.
Primary prerequisites for the tool are:
- Mongoose models with Joi validation information
- The models have to be disconnected, no nested model information; if nested, the handlers need to be overridden
Inspiration:
While doing hapijs app with mongoose, the problem with Mongoose schemas and Joi validations was that they were most of the times same and needed to be specified separately. And the REST API was surely going to have few predefined routes; why not have a constructor to do all this at once.
P.S. It also contains the swagger documentation generation info; if you are using same, it automatically gets counted.
How does it work?
It can be used to generate the pluggable entities which can be reused later. Following code depicts that:
//file: models/person.js
const Joi = require('joi');
const getItReady = require('get-it-ready');

const personDefinition = {
  firstName: {
    type: String,
    required: true,
    joi: Joi.string()
  },
  lastName: {
    type: String,
    required: true,
    joi: Joi.string()
  },
  createdOn: {
    type: Date,
    required: false,
    default: Date.now,
    joi: Joi.date()
  }
};

module.exports = getItReady(personDefinition, 'people', 'Person', 'person');
which will generate the following code structure:
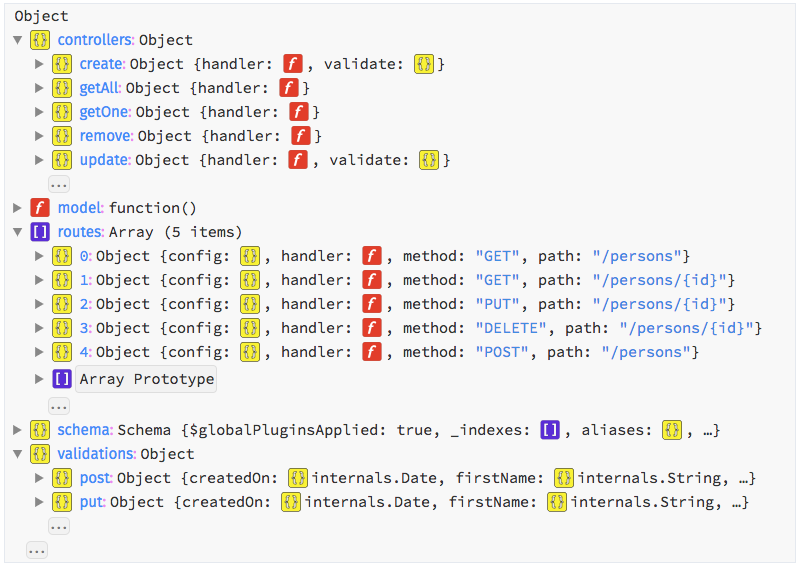
The above structure has following important things:
- routes
- controllers
- validations
- model
- schema
The routes are the ultimate consumables i.e. plug them and forget. The rest of the entities are usable as per the level of customisation needed.
Lets look at use of above entities in a hapijs server code.
//file: index.js
const Hapi = require('hapi');
const Mongoose = require('mongoose');

Mongoose.Promise = global.Promise;

// Create a server with a host and port
const server = new Hapi.Server();
server.connection({
  host: 'localhost',
  port: Number(process.argv[2]) || 8080
});

// Add the route
server.route({
  method: 'GET',
  path:'/',
  handler: function (request, reply) {
    return reply('HapiJS Server running!');
  }
});

//Import the artefacts of person model
const person = require('./models/person');
//patch the artefacts to server routes
server.route(person.routes);
//done.

// Start the server
server.start((err) => {
  if (err) {
    throw err;
  }
  console.log('Server running at:', server.info.uri);
});
As you can see, adding the model was simply done in two lines after we have the artifacts from get-it-ready
Now lets consider a complex example of basic micro-blogging schema where users and posts are the two important entities and following is the schema structure for post.
//file: models/post.js
const Joi = require('joi');
const { Schema } = require('mongoose');
const getItReady = require('get-it-ready');

const definition = {
  text: {
    type: String,
    required: true,
    joi: Joi.string()
  },
  createdOn: {
    type: Date,
    required: false,
    default: Date.now,
    joi: Joi.date()
  },
  timestamp: {
    type: Date,
    required: true,
    default: Date.now,
    joi: Joi.date()
  },
};

module.exports = getItReady(definition, 'posts', 'Post', 'post');
So If we consider above schema for post
//Import the artefacts
const person = require('./models/person');
const post = require('./models/post');

//patch the artefacts to server routes
server.route(
  [].concat(person.routes, post.routes)
);
//done.
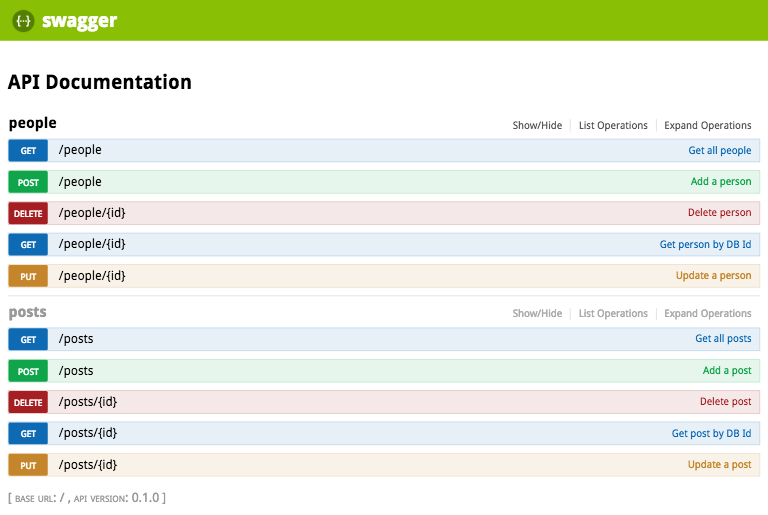
It will look like following in the swagger documentation:
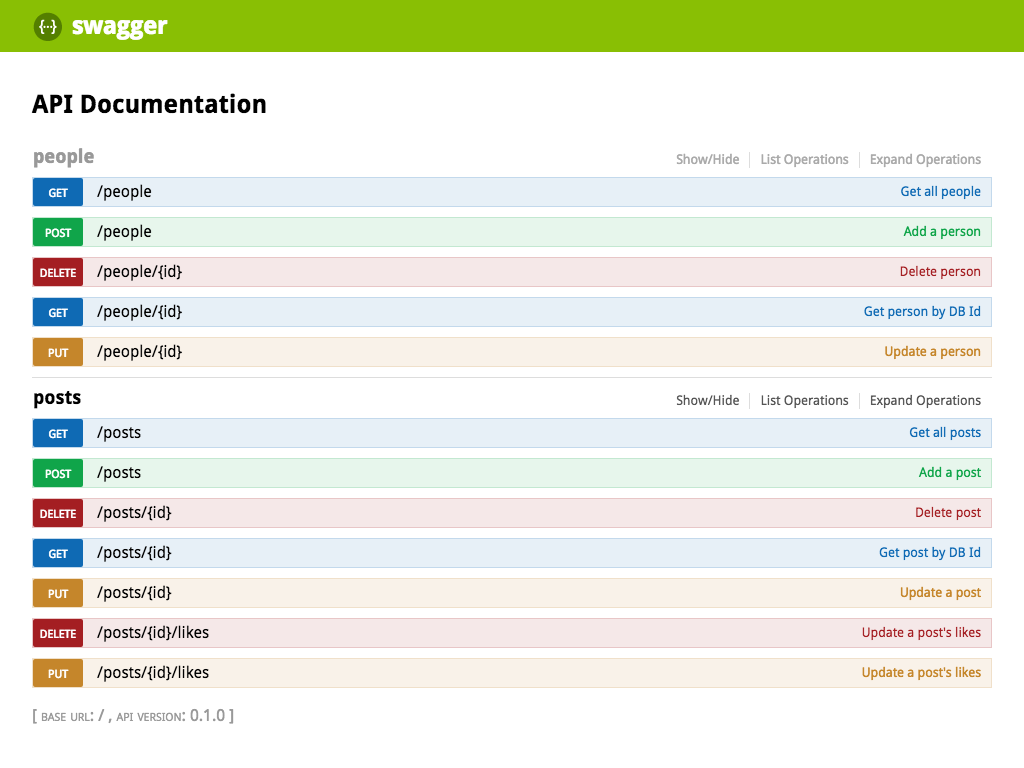
Assuming that authentication is already in place and keeps the logged-in user's id in the session; lets add another field to the schema; likedBy field for the post schema. which looks like following:
   },
+  likedBy: {
+    type: [Schema.ObjectId],
+    default: [],
+    required: false,
+    joi: Joi.array().items(Joi.string()),
+  }
   timestamp: {
And you just need to restart the server and it is done.
As you can see, we have easily created the post schema and the user schema and the REST API for those schemas.
But by adding the likedBy field to the post schema, we have a new problem in our API. The likedBy field is a collection of user._id which means straightforward CRUD opration on this field is not possible.
To solve this problem, we can get the artifacts from get-it-ready and then customize the controllers to fit our needs.
As we have basic controllers ready, we can manually create any specific controller and attach to the routes. And then pass those routes to hapi server instance.
which give us following endpoints:
You might have noticed the structure of above file little different that the explained on for models/persons.js. The reason is that when you span your models/schemas in different files, the connection for the mongodb is not maintained as a singleton; so to avoid that situation, the connection object is passed as a dependency to the get-it-ready script.
Following is the way to make the connection dependency work in the server file:
const Mongoose = require('mongoose');

Mongoose.Promise = global.Promise;

Mongoose.connect('mongodb://localhost/tempDb', {
  useMongoClient: true,
});

const db = Mongoose.connection;
// Import the artefacts
const person = require('./models/person')(db);
const post = require('./models/post')(db);
whole file can be seen here: https://github.com/pankajpatel/get-it-ready/blob/master/examples/microblog/index.js