? CustomEvents: JavaScript Events on steroids
CustomEvents in JavaScript are Events on Steroids. CustomEvents will solve the common event related problem effectively in a high level JS application

Events, the core part of JavaScript and still painful area for many Developers.
Events have scared people off to enter JS; Events have terrified the debugging sessions. But they are like little Pikachu; you just need to understand them and it is like a play of your left hand to make the best use of them.
Today we will see how we can use Custom Events to build good communication in our App Components. We will use WebComponents to go through the Use Cases and Solutions.
But before we jump into the discussion, let's take a quick look at the Event Loop in JavaScript.
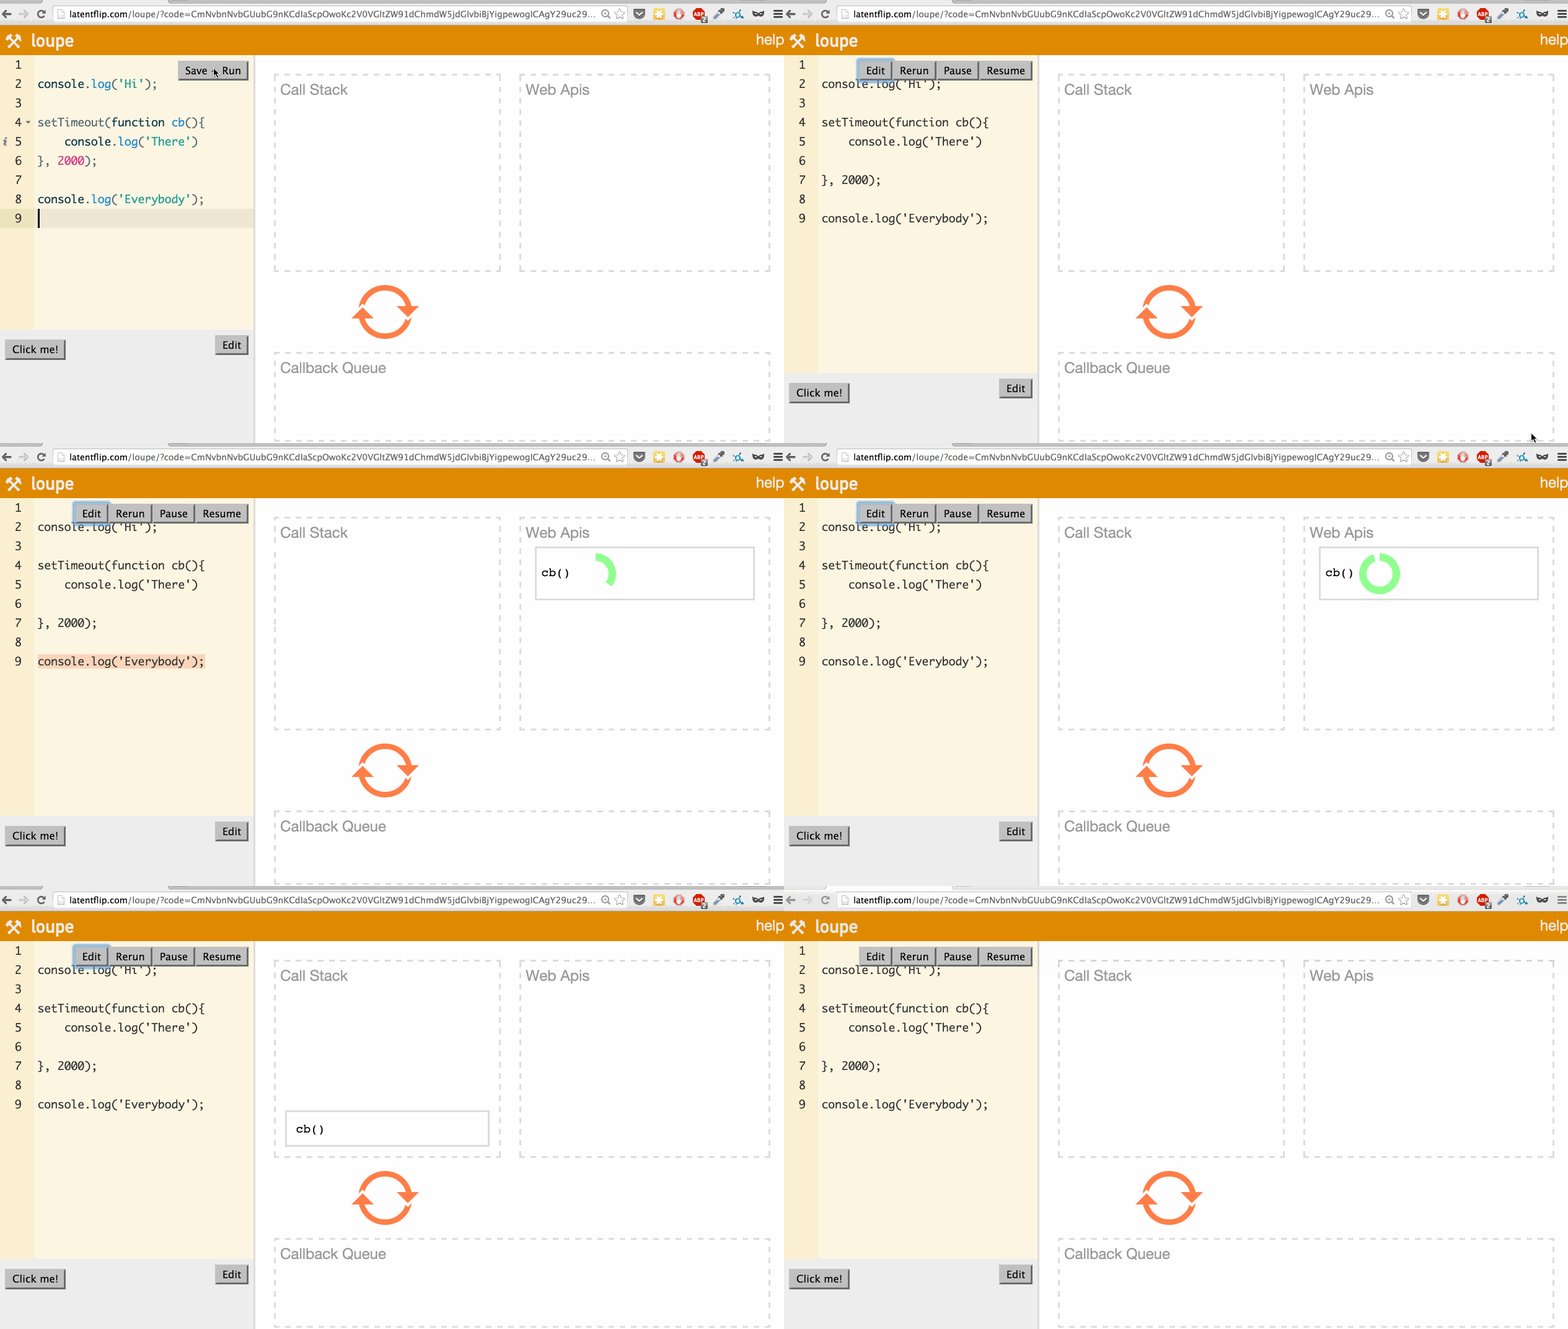
It is worth time to read about the event loop as it will give you an understanding of how Asynchronous Execution works in JavaScript at the core level.
If you know about it, you can skip this part and jump to CustomEvents
Environment
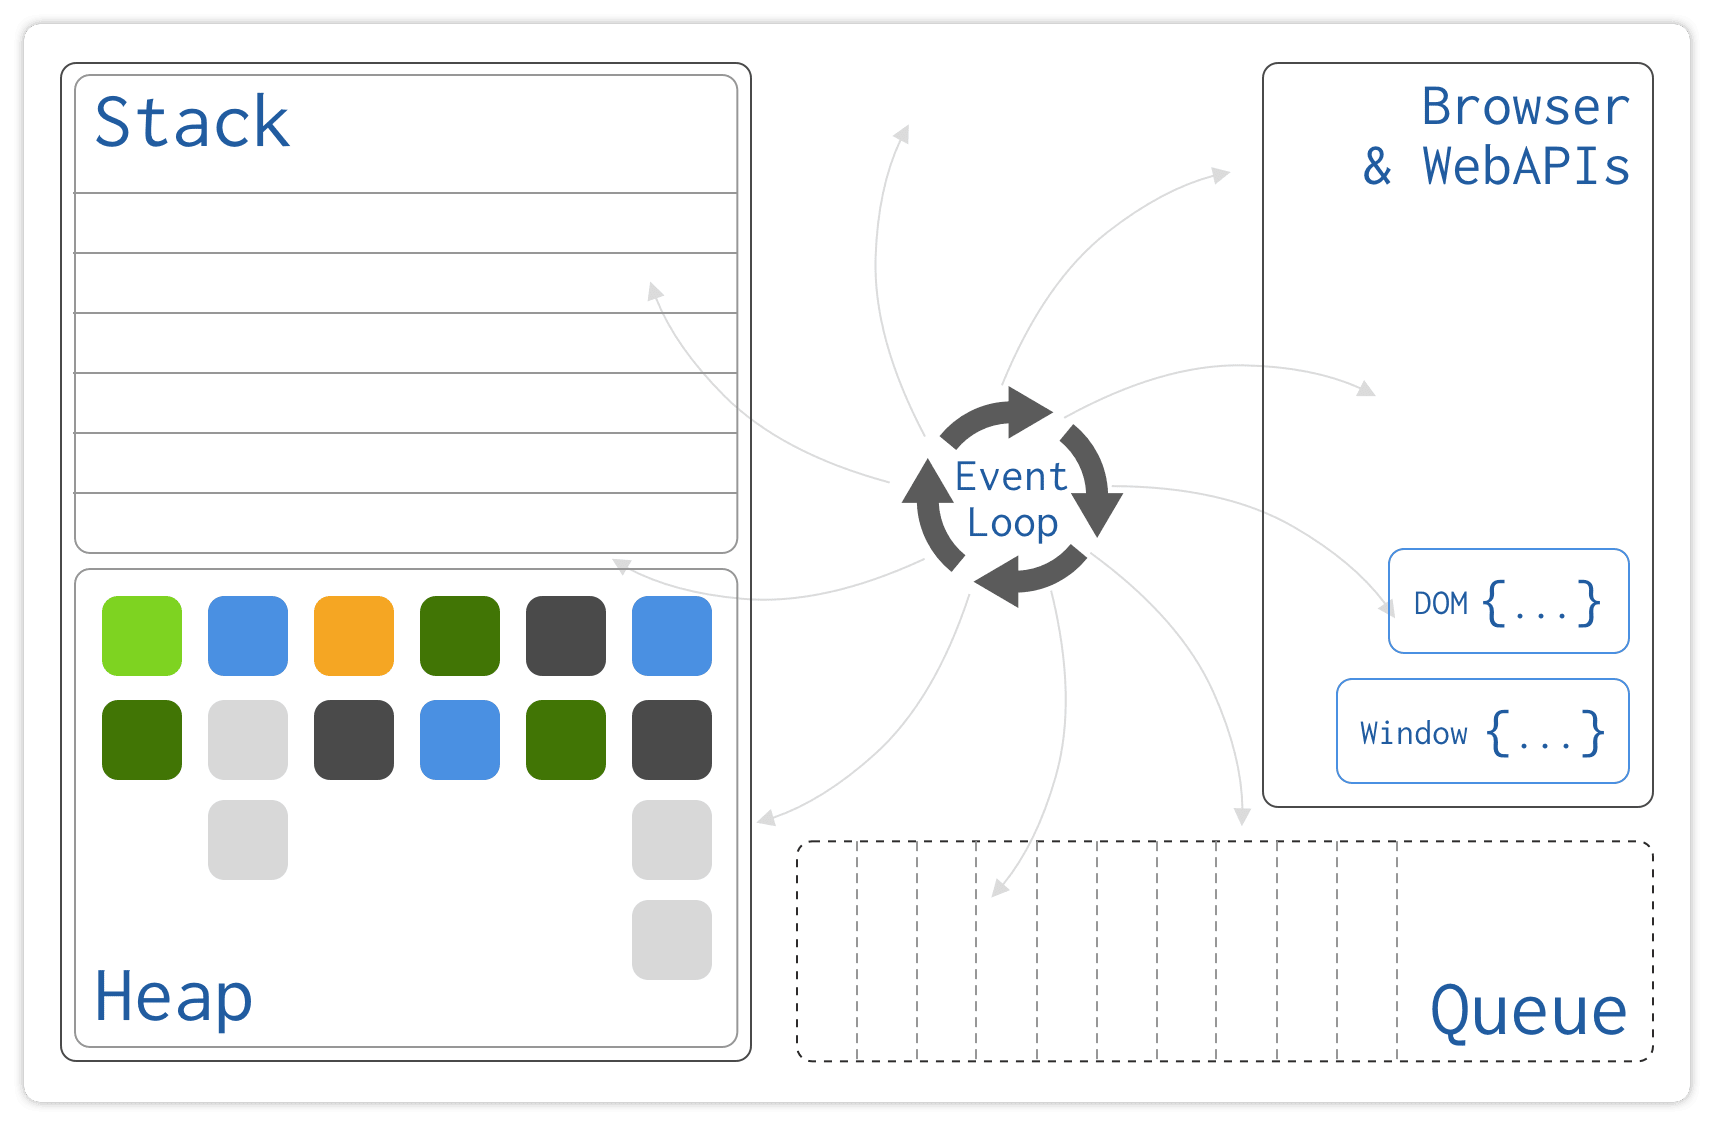
JS is single threaded and has Stack, Heap, Event Queue and Event Loop. Let's briefly go through their nature and what they are.

JS Stack
It keeps the information of currently executing functions in the order to time of execution; as older the function had started, deeper level it will be in the stack.
As the function finishes executing, it gets removed from the stack.
Heap
Heap is the storage area from where the memory will be allocated to the executing functions, variables etc.
Event Queue
The Event Queue is the place where all the events get added and are processed by the JS Engine thread. As the name 'Queue' suggests, the events are First-In-First-Out (FIFO)
Event Loop
Event Loop is the synchronous watcher for the events i.e. it will wait for the messages/events.
As the events appear in the queue, it processes them. And if they don't, it will synchronously wait for the next message. So in terms of code, it can be written as follows:
while(queue.waitForMessage()) {
  queue.processNextMessage();
}
And in general the is how they are working together with each other:

Now let's come to some common problem faced when handling Events in JavaScript:
Same Name Events
Many elements have same name events like click is available on All HTML Elements; change event is available on all Input elements etc. And as we know that the events are bubbling in nature, you can capture the same event at any level until the document's visible root body.
The problem occurs when you wanna handle the same kind of events in a different part of the App.
Consider following HTML and JS as example:
<article data-id="12345">
  <header>
    <a href="https:/time2hack.com/">
      <h1>Callbacks, Promises and Async/Await</h1>
    </a>
  </header>
  <span>Lorem ipsum dolor sit amet consectetur adipisicing</span>
  <footer>Written by: <a href="/author/pankaj">Pankaj</a></footer>
</article>
const author = document.querySelector('article span[author]');

author.addEventListener('click', (e) => {
  const author = e.target.getAttribute('author');
  const url = `/author/${author}`
  window.location.href= url;
});
Now as you can see, if only click event was being listened on the article tag, it would have caused wrong action of redirecting to author page where it meant to go to the post page.
More common scenarios happen when there is data tracking done based on these events.
PreventDefault and StopPropagation
event.preventDefault() and event.stopPropagation()
These two guys have quickly fixed many bugs but have been a pain in the ass most of the times because of those fixes.
How?
I stopped propagation at one point and forgot that at upper level, I am waiting for that event to happen.
I prevented default on some events so that my handlers could work but now there are other children elements whose defaults might also get prevented.
I am not saying I do the same mistakes now as well but during the times of my start in the FrontEnd, debugging event based problems was major part of the workday.
Solution? Use CustomEvents.
CustomEvents
CustomEvents are the same as regular events and at the same time different from regular/native events.
Similarities
- Instance of
Eventconstructor - Can bubble; means you can use
stopPropagation - Cancellable; means you can use
preventDefault - Same Object Properties and Methods like
target,currentTargetetc. - Can not be copied with
Object.assign
Differences
- Instance of
CustomEventconstructor - Can have custom Data with Event
- Different Names thank the regular ones (Obviously)
So how do we create a Custom Event?
const myEvent = new Event('my-event');

//or with data
const myNewEvent = new CustomEvent('my-new-event', {
  bubbles: true,
  detail: {
    text: 'From somewhere in the app',
    version: '0.1.1',
  },
  cancelable: true,
});
That's it. With the CustomEvent constructor, you can create a simple custom event and pass additional params as an object in second params. Config options include:
- To define data, you need to add
detailkey and data as its value cancelableto define the cancel-ability of the eventbubblesproperty to make event be catchable on the upper hierarchy
But how do we trigger this new CustomEvent on our element?
With dispatchEvent on any element; following is the example:
const author = document.querySelector('article span[author]');
author.dispatchEvent(myEvent);

//or event with the data
author.dispatchEvent(myNewEvent);
How do we listen to this Event? Here is how:
const article = document.querySelector('article');

article.addEventListener('my-event', (e) => {
  console.log('my-event', e);
});

article.addEventListener('my-new-event', (e) => {
  console.log('my-new-event', e, e.detail);
});
So this is how you can create CustomEvents and use them in your project.
There is a bit of coding overhead but it will be so manageable and you will thank yourself when you return to the project after a few months.
Use Case
Let's look at an example to explain the case of CustomEvents.
Let's create a Twitter tweet screen with web components. And we will use custom events to facilitate the data communication between the components.
Here we have a global state in the the top level application. This component will bind the user with the tweets and send it back to the server with fetch.
And following stateless components :
- New tweet
- Tweet view
- Feed
Among all the above complement, the new tweet and the main controller are the components where we will concentrate.
Firstly, let’s create the new tweet component. Following is the code for new tweet component:
import template from './form.html';
import customeEvent from '../../custom-event';

export const FORM_COMPONENT = 'tc-form';
export const EVENTS = {
  CREATE_TWEET: 'tc-event-new-tweet'
}

class Form extends HTMLElement {
  connectedCallback() {
    this.render();
  }
  render() {
    this.innerHTML = template({});
    this.collectRefs();
    this.refs.button.addEventListener('click', (e) => {
      if(!this.refs.text.value) {
        return;
      }
      this.dispatchEvent(customeEvent(EVENTS.CREATE_TWEET, {
        text: this.refs.text.value,
      }));
      this.refs.form.reset();
    });
  }
  collectRefs() {
    this.refs = {
      text: this.querySelector('[ref="text"]'),
      form: this.querySelector('[ref="form"]'),
      button: this.querySelector('[ref="btn-submit"]'),
    }
  }
}

customElements.define(FORM_COMPONENT, Form);
For above code, I made a small wrapper to create customEvent which is as follows:
module.exports = (
  name,
  eventData,
  bubbles = true,
  cancelable = true,
) => new CustomEvent(
  name, {
    detail: eventData,
    bubbles,
    cancelable
  }
);
As now we have our form and customEvent wrapper, we will now prepare our main controller component. Here is the code for main controller which will handle the new tweet and send it to backend and alongside, push to the feed:
import customeEvent from '../custom-event';
import {
  EVENTS as FORM_EVENTS,
  FORM_COMPONENT,
} from './form/form.component';
import { FEED_COMPONENT } from './feed/feed.component';
import template from './app.html';
import css from './app.css';

export const EVENTS = {
  PUSHED_TWEET: 'tc-event-pushed-tweet'
}
const STORE = {};
const USERS = {
  time2hack: {
    username: 'time2hack',
    name: 'Time to Hack',
    photo: '',
  },
}
class Clone extends HTMLElement {
  connectedCallback() {
    this.dom = this.attachShadow({ mode: 'open' });
    this.dom.innerHTML = template({ title: 'Twitter', css });
    this.refs = {
      form: this.dom.querySelector(FORM_COMPONENT),
      feed: this.dom.querySelector(FEED_COMPONENT),
    }
    this.dom.addEventListener(FORM_EVENTS.CREATE_TWEET, (e) => {
      const time = +new Date()
      const tweet = {
        tweet: Object.assign({}, e.detail, {time}),
        user: USERS.time2hack,
      };
      STORE[time] = Object.assign({}, tweet);
      this.dispatchEvent(customeEvent(EVENTS.PUSHED_TWEET, { tweet }))
    });

    this.addEventListener(EVENTS.PUSHED_TWEET, (e) => {
      this.refs.feed.pushTweet(e.detail.tweet);
    })

  }
}

customElements.define('twitter-clone', Clone);
And as you can see above, The main controller just has to worry about the event name-spaced from the child component and no native events like click, change etc.
And in a similar way, we can fire these CustomEvents on the feed to add new tweets.
Following is the Feed component to receive the new tweets to render:
import { TWEET_COMPONENT } from '../tweet/tweet.component';

export const FEED_COMPONENT = 'tc-feed';
const template = (scope) => `<div class="list-group" ref="list">
  <h4>Your Feed</h4>
  ${scope.tweets.map(getTweetMarkup).join('')}
</div>`;

const TWEET = {
  user: {
    username: 'heypankaj_',
    name: 'Pankaj Patel',
    photo: '',
  },
  tweet: {
    text: 'lsjdhjgj gdfgdfg gdfgdfg dfgfd',
    time: 1558425005922,
  }
}

const getTweetMarkup = (tweet) => `
<${TWEET_COMPONENT}
  tweet='${JSON.stringify(tweet)}'
></${TWEET_COMPONENT}>`;

class List extends HTMLElement {
  connectedCallback() {
    this.render();
  }
  render() {
    console.log(TWEET);
    this.innerHTML = template({
      tweets: [].concat([TWEET, TWEET]),
    });
  }
  pushTweet(_tweet) {
    const tweet = document.createElement('div');
    tweet.innerHTML = getTweetMarkup(_tweet);
    this.querySelector('[ref="list"]').appendChild(tweet.firstChild);
  }
}

customElements.define(FEED_COMPONENT, List);
And of course the tweet component to render the view of the tweet:
import { timeAgo } from '../../time-ago';

const template = (scope) => `<div class="card">
  <div class="card-body">
    <h5 class="card-title">${scope.user.name}</h5>
    <p class="card-text">${scope.tweet.text}</p>
    <p class="card-text">
      <a href="#" class="card-link">Retweet</a>
      <a href="#" class="card-link">Like</a>
      <small class="float-right text-muted">${timeAgo(scope.tweet.time)}</small>
    </p>
  </div>
</div>`;

export const TWEET_COMPONENT = 'tc-tweet';

class Tweet extends HTMLElement {
  connectedCallback() {
    this.data = JSON.parse(this.getAttribute('tweet') || '{}');
    this.innerHTML = template(this.data);
  }
}

customElements.define(TWEET_COMPONENT, Tweet);Conclusion
In the above code examples and argument; you can see that the CustomEvents are better approach to handle & manage; while reducing the chances of unexpected error because of native events.
Let me know through comments ? or on Twitter at @heypankaj_ and/or @time2hack
If you find this article helpful, please share it with others ?
Subscribe to the blog to receive new posts right to your inbox.
Credits
- Photos by Irvan Smith on Unsplash
- Icon made by Freepik from Flaticon & licensed under CC 3.0 BY
- time-ago functions from https://muffinman.io/javascript-time-ago-function/

