Manually Migrate Wordpress Blog or Site From one Host to Another
A brief guide to Manually migrating any Wordpress Blog or Site from one host to another with very less effort


WordPress has been emerged as the most popular CMS and has been mostly used for Blogging.
WordPress is also used for creating websites as it provides an easy customization, a large theme & plugin library and moreover an easy to use Dashboard to minimize the website management efforts.
You might need to migrate the WP blog or site to another host or from local to online server. So in order to migrate there are two ways:
- Using WP export
- Manual Migration
Using WP Export:
Using this method you will not need to worry about too many things; only things that you have to worry about are plugins, theme and uploads/attachment.
Manual Migration:
In this type of migration you will have to have same basic idea of using the cPanel or any other panel provided by your host and any one efficient editor. Here the demo is on cPanel and editor used is Sublime Text 3.
Now following are easy steps to manually migrate WordPress Blog or Site from one host to another:
Step 1: Get all you blog files ready
Compress the WordPress installation directory and download it if it's the blog migration and if its local installation; zip the folder and keep it at another place. We will upload all theses files and then working on them.
Step 2: Get the WordPress database backup
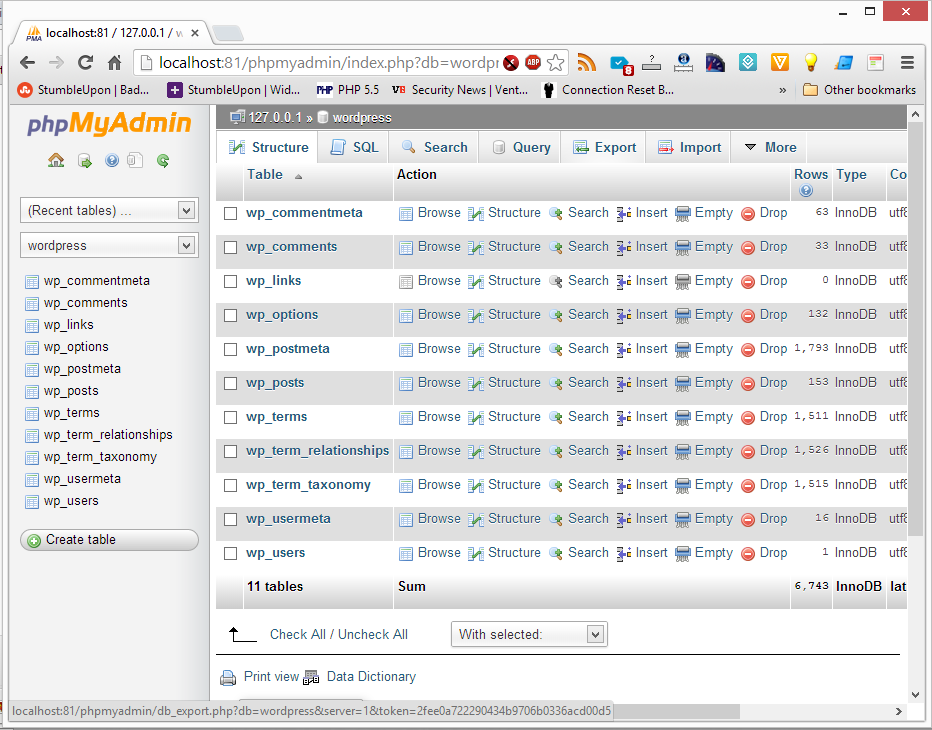
Open up phpMyAdmin of your remote host or local installation and download the compete database backup as sql file. For this
Navigate and open the phpMyAdmin.
Now load the WordPress Database.
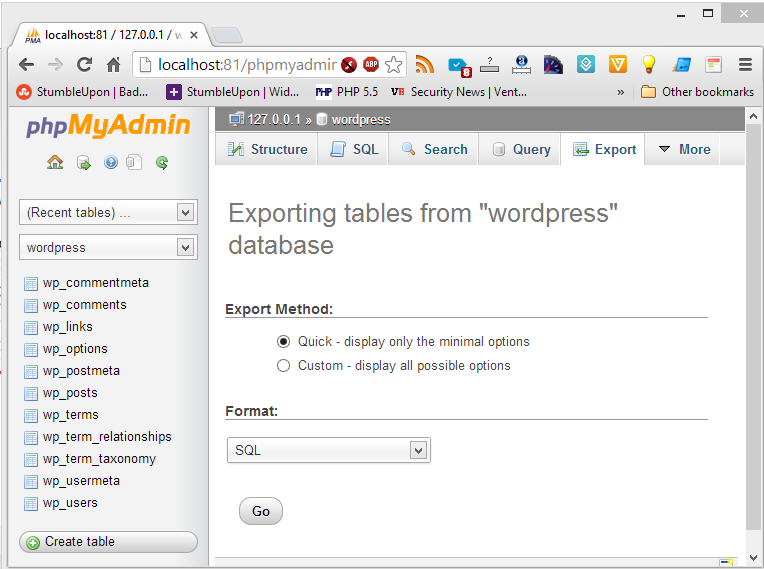
Now click on Export tab in phpMyAdmin.

Click on Go. The backup file as databsename.sql file will be downloaded

Step 3: Upload the WordPress files to new host
Upload the zip file or the compressed archive to new host and extract it. While extracting make sure all files are going to domain’s base directory. If not then move all file to domain’s base directory.
Step 4: Edit the wordpress configuration
Edit the wp-config.php file at your new host and change the database host, database name, database user name and database password. These configurations are found after like #19 and may look like following code:
/** The name of the database for WordPress */
define('DB_NAME', 'sampleWordpressDatabase');

/** MySQL database username */
define('DB_USER', 'root');

/** MySQL database password */
define('DB_PASSWORD', '');

/** MySQL hostname */
define('DB_HOST', 'localhost');
And you have to change the above lines to the point marked as #NEW# in following code:
/** The name of the database for WordPress */
define('DB_NAME', '#NEW# Database Name');

/** MySQL database username */
define('DB_USER', '#NEW# Database User Name');

/** MySQL database password */
define('DB_PASSWORD', '#NEW# Database User Password');

/** MySQL hostname */
define('DB_HOST', '#NEW# Database Host');
Step 5: Change the routing rules in .htaccess file
If you are uploading the local installation of WordPress to your remote host then you need to change the routing rules so that everything goes fine. Suppose you have installed the WordPress locally on wordpress folder in public directory of server. Then change following or similar code
# BEGIN WordPress
<IfModule mod_rewrite.c>
RewriteEngine On
RewriteBase /wordpress/
RewriteRule ^index\.php$ - [L]
RewriteCond %{REQUEST_FILENAME} !-f
RewriteCond %{REQUEST_FILENAME} !-d
RewriteRule . /wordpress/index.php [L]
</IfModule>

# END WordPress
to
# BEGIN WordPress
<IfModule mod_rewrite.c>
RewriteEngine On
RewriteBase /
RewriteRule ^index\.php$ - [L]
RewriteCond %{REQUEST_FILENAME} !-f
RewriteCond %{REQUEST_FILENAME} !-d
RewriteRule . /index.php [L]
</IfModule>

# END WordPress
Step 6: Modify SQL database backup before restore
Step 6a:
Now as you are moving the files to remote or new host. If it is from local to remote host the you need to change the URIs in SQL backup and if it is from one host to another newer host then it is not required in general; but may be required according to migration needs.
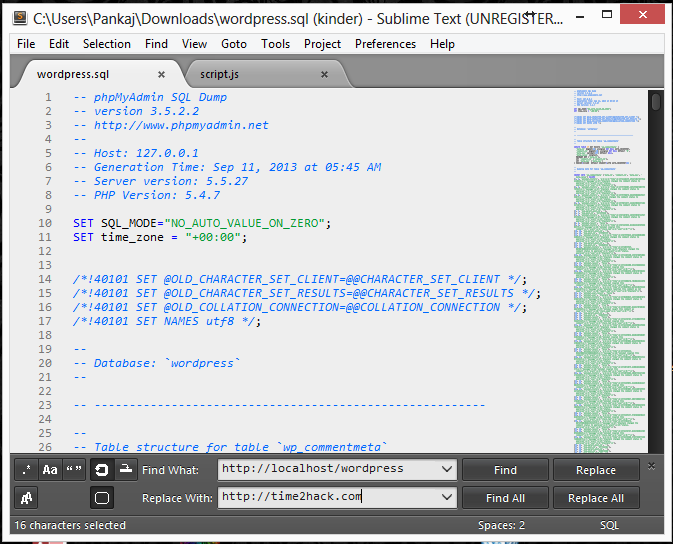
AS we had discussed that WordPress is installed on wordpress directory. So the local URL is http://localhost/wordpress . Now you need to update it to the URL of your Site like if I want to move it to time2hack.com then I will find and replace all occurrences of http://localhost/wordpress with https://time2hack.com

For this you can use any of the text editor and as I specified earlier; I have used Sublime Text 3 editor for this purpose. In Sublime Text 3, press Ctrl+H then in Find box type the http://localhost/wordpress and in Replace Box type https://time2hack.com and then click on Replace All button. Done.

Step 6b:
Now we need to update the path of the uploaded files in the database backup file. Like if we are working locally with XAMPP then the local path of the files might be C:\XAMPP\wordpress\…. etc. So we have to fine and replace C:\XAMPP\wordpress\ with new path of the files in hosting server.
So on hosting web server suppose out hosting account username is time2hack then the files are generally placed under /home/time2hack/public_html/… directory.
Now if time2hack.com is base URL of the Hosting Account then the string to be replaces is /home/time2hack/public_html/ but if its not and has been added as an Add On Domain then the string to be replaced is /home/time2hack/public_html/time2hack.com/.
So decide accordingly by looking into your hosting account and replace the string C:\XAMPP\wordpress\ appropriately. For now consider I have replaced it with /home/time2hack/public_html/time2hack.com/.
One thing you need to consider is that you need to check for the CREATE and USE statements of database in between 20th to 30th line. If these types of lines are found just delete them.
After it is done, you are ready to restore your backup of database.
Step 7: Restore the database backup
- Open up the cPanel
- Navigate and open the phpMyAdmin
- Now load the New WordPress Database
- Now click on Import tab in phpMyAdmin
Browse for the new backup file and then click on Go. If it shows the success message then the step was successful.
Step 8: Done
Check if it's working. If yes then we are done. Try to open website on your browser and after opening, try to navigate and click on certain links to ensure that everything is fine. And then also test the working of Admin Dashboard of your site.
If you face any problem at any point; just comment over here and we will try to resolve that problem.

